
Showing posts with label Candy Buffet Cincinnati. Show all posts
Showing posts with label Candy Buffet Cincinnati. Show all posts
Monday, December 5, 2011
Upcoming Candy Buffet
This Wednesday CandyShopBuffets will be doing a super sweet candy buffet for something very special! I will be making the finishing touches today and tomorrow and will be uploading pictures as soon as Thursday! The theme will be silver and metallic and just all over sparkly. Stay Tuned.... ;)
Monday, November 14, 2011
Fall Favor Bags!
About a month ago I designed favor bags for Krista and Dan's wedding! Their venue of choice was the Inn at Oneonta in Kentucky. It was a gorgeous day and the favor bags looked super cute up against the wonderful natural coloring of the venue. Here are some of our pictures from that day! Enjoy :)


Thursday, November 3, 2011
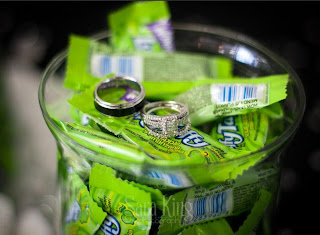
Our Pink and Silver Candy Buffet!
I got asked to do a candy buffet at a wedding in October! It was a
beautiful day, beautiful bride, and wonderful reception. Here are some
pictures of my "mock up" for that day! Unfortunately I did not have
time to snap pictures at the actual venue, but I can assure you it was
lovely!


Thank you to Carson and Stephanie for allowing me to be part of their special day!
Wednesday, October 26, 2011
Halloween Candy Day #5
This is the last one for today, and even easier than the recipes before!
Witches hats are always in fashion around Halloween...what better way to keep the theme of the party, than with mini candy witches hats? Love how cute these look and how simple they are to make!

Witches hats are always in fashion around Halloween...what better way to keep the theme of the party, than with mini candy witches hats? Love how cute these look and how simple they are to make!

Ingredients
- 1 (4.25-ounce) tube orange or red decorating frosting
- 1 (11 1/2-ounce) package fudge-striped shortbread cookies (32 cookies)
- 1/2 (13-ounce) package milk chocolate kisses, unwrapped (32)
Preparation
- Pipe a small mound of frosting in center of each chocolate-covered cookie bottom; press a chocolate kiss on frosting. Pipe a frosting band and bow around base of each kiss.
Halloween Candy Day #4
I missed Monday and Tuesday this week so stay with me as we get a few more recipes up to date!
This super simple treat will add the chocolatey goodness you need at any party!
Day #4 is Spider Web Candy!

This super simple treat will add the chocolatey goodness you need at any party!
Day #4 is Spider Web Candy!
Ingredients
- 1/3 cup semisweet chocolate chips
- 6 ounces white baking chocolate, coarsely chopped
- 1 teaspoon shortening
- 1/3 cup flaked coconut, coarsely chopped
Directions
- In a small microwave-safe bowl, melt chips; stir until smooth. Cool slightly. Transfer to a heavy-duty resealable plastic bag; cut a small hole in corner of bag and set aside.
- In another small microwave-safe bowl, melt white chocolate and shortening; stir until smooth. Stir in coconut. Spoon 2 tablespoonfuls onto waxed paper-lined baking sheets; spread into a 4-in. circle. Repeat four times.
- Using reserved melted semisweet chocolate, pipe thin concentric circles an 1/8 in. apart on top of each candy. Beginning with the center circle, gently pull a toothpick through circles toward outer edges. Wipe toothpick clean. Repeat to complete web pattern. Refrigerate for 30 minutes or until set. Store in an airtight container. Yield: 5 candies.
Halloween Candy Day #3
These are just too cute and pretty simple if you are good at making meringue!
Day #3- Meringue Ghosts :)

2. Turn the mixer to medium-high speed and beat until the egg whites are foamy. Turn the mixer off, add the cream of tartar, and continue beating on medium-high until the whites have turned an opaque white color and hold soft peaks.
3. At this point, start adding the powdered sugar a few spoonfuls at a time with the mixer running. Once all of the sugar has been added, add any extracts you are using and turn the mixer to high speed. Continue to beat the egg whites until they are very thick, glossy, and a shiny white color. When you stop the mixer and lift the whisk out of the whites, the whites should have a very stiff peak. This process will take about 7-12 minutes in a stand mixer.
4. Cover two baking sheets with parchment paper. Scoop your meringue mixture into a piping bag fitted with a ½ inch round tip, or if you don’t have this, into a large Ziploc bag with a ½ inch hole cut in the corner.
5. Pipe your meringue into ghost shapes about 1-1/2 inches wide and 2 inches tall. You can either do this by squeezing the bag and pulling up gradually, making one big “blobby” ghost, or by making a series of concentric circles spiraling upward. Pipe 12 ghosts onto each baking sheet, for a total of about 2 dozen meringue ghosts.
6. Bake the meringues in the preheated oven for an hour. After an hour, open the oven door and continue to cook for 30 minutes, then turn the oven off, close the door, and allow the meringues to sit until completely cool, about 1 hour.
7. Once the meringues are crisp and room temperature, melt the chocolate in a microwave-safe bowl, stirring after every 30 seconds to prevent overheating. If you want to coat the bottoms in crushed nuts, sprinkles, or toasted coconut as well, place those toppings in small, shallow bowls nearby.
8. Dip the bottoms of the ghosts in the melted chocolate, and scrape the bottoms against the lip of the bowl to remove excess chocolate. If you’re dipping them in other toppings, immediately press the bottom of the ghost into the bowl of toppings so they adhere to the wet chocolate. Replace the dipped ghost back on the baking sheet and repeat with remaining ghosts and chocolate. Dip a toothpick in the remaining melted chocolate and give each ghost two dots for eyes and, if you desire, a mouth or other features.
9. Refrigerate the ghosts to set the chocolate, about 5-10 minutes. Do not refrigerate them any longer than absolutely necessary, as they will absorb moisture from the refrigerator and lose their crispness. Store Meringue Ghosts in an airtight container at room temperature.
Credit: About.com
Day #3- Meringue Ghosts :)

Yield: 24 ghosts
Ingredients:
- 2 egg whites, room temperature
- 1/8 tsp cream of tartar
- 3/4 cup powdered sugar
- 1/2 tsp flavored extract, like vanilla or almond
- 8 oz semi-sweet chocolate
- toasted nuts, coconut, or sprinkles (optional)
Preparation:
1. Preheat the oven to 200 degrees. Place the room temperature egg whites in the clean bowl of a stand mixer fitted with a whisk attachment. (Alternately, you can use a large bowl and a hand mixer with whisk attachments.)2. Turn the mixer to medium-high speed and beat until the egg whites are foamy. Turn the mixer off, add the cream of tartar, and continue beating on medium-high until the whites have turned an opaque white color and hold soft peaks.
3. At this point, start adding the powdered sugar a few spoonfuls at a time with the mixer running. Once all of the sugar has been added, add any extracts you are using and turn the mixer to high speed. Continue to beat the egg whites until they are very thick, glossy, and a shiny white color. When you stop the mixer and lift the whisk out of the whites, the whites should have a very stiff peak. This process will take about 7-12 minutes in a stand mixer.
4. Cover two baking sheets with parchment paper. Scoop your meringue mixture into a piping bag fitted with a ½ inch round tip, or if you don’t have this, into a large Ziploc bag with a ½ inch hole cut in the corner.
5. Pipe your meringue into ghost shapes about 1-1/2 inches wide and 2 inches tall. You can either do this by squeezing the bag and pulling up gradually, making one big “blobby” ghost, or by making a series of concentric circles spiraling upward. Pipe 12 ghosts onto each baking sheet, for a total of about 2 dozen meringue ghosts.
6. Bake the meringues in the preheated oven for an hour. After an hour, open the oven door and continue to cook for 30 minutes, then turn the oven off, close the door, and allow the meringues to sit until completely cool, about 1 hour.
7. Once the meringues are crisp and room temperature, melt the chocolate in a microwave-safe bowl, stirring after every 30 seconds to prevent overheating. If you want to coat the bottoms in crushed nuts, sprinkles, or toasted coconut as well, place those toppings in small, shallow bowls nearby.
8. Dip the bottoms of the ghosts in the melted chocolate, and scrape the bottoms against the lip of the bowl to remove excess chocolate. If you’re dipping them in other toppings, immediately press the bottom of the ghost into the bowl of toppings so they adhere to the wet chocolate. Replace the dipped ghost back on the baking sheet and repeat with remaining ghosts and chocolate. Dip a toothpick in the remaining melted chocolate and give each ghost two dots for eyes and, if you desire, a mouth or other features.
9. Refrigerate the ghosts to set the chocolate, about 5-10 minutes. Do not refrigerate them any longer than absolutely necessary, as they will absorb moisture from the refrigerator and lose their crispness. Store Meringue Ghosts in an airtight container at room temperature.
Credit: About.com
Friday, October 21, 2011
Halloween Candy Day #2
Day #2- Monster Eyeballs
To me, this seems like a take on the popular buckeye that Ohio is known for. Since I am based out of Cincinnati, I just had to share this one!
 Ingredients:
To me, this seems like a take on the popular buckeye that Ohio is known for. Since I am based out of Cincinnati, I just had to share this one!

- 1 1/2 cups creamy peanut butter
- 1/2 cup (1 stick) butter, at room temperature
- 1 (1-pound) package confectioners’ sugar (about 4 cups)
- 1 teaspoon vanilla extract
- 1 (12-ounce) package semisweet chocolate chips (2 cups)
- 2 tablespoons solid vegetable shortening
- 1 (3-ounce) package miniature M&Ms
Directions:
1. Blend the peanut butter with the butter, sugar, and
vanilla in a medium bowl. It may be easiest to use your hands (kids love
doing this).
2. Line a rimmed baking sheet with wax paper. Roll the
peanut butter mixture by teaspoons into small balls and place on the
baking sheet. Refrigerate for at least 1 hour to firm up the eyeballs.
3. Put the chocolate chips and shortening in a
microwave-safe bowl and melt the chocolate in the microwave: Heat on
high for 60 seconds, and then stir well. If it’s not quite smooth, heat
in two or three 10-second bursts, stirring well after each burst.
(Alternatively, you can melt the chocolate, stirring frequently, in a
double boiler, over just-simmering water. Avoid overheating, which can
cause chocolate to seize up into a stiff mass.)
4. Take the sheet of balls from the refrigerator; use a
fork or a toothpick to dip each one most of the way into the chocolate,
leaving a round or oval opening of undipped peanut butter on top. (This
opening in the chocolate will be the cornea.) Hold each ball over the
chocolate to catch the drips, and then return to the wax paper, cornea
side up.
5. Place an M&M in the center of the peanut butter
cornea to make an iris. Refrigerate for at least 1 hour before serving.
Store the eyeballs in the refrigerator or freezer and serve chilled.
Tuesday, October 18, 2011
Mini Candied Apples
Here is an amazing candied apple recipe that you can use for your dessert table as a special addition, or have a waiter hand out during your fall event! They are cute, mini, and almost bite-sized :)

Recipe

Recipe
- Vegetable oil cooking spray
- 10 to 12 small lady apples, stemmed
- 2 cups sugar
- 3/4 cup light corn syrup
Directions
- Coat a rimmed baking sheet with cooking spray. Insert a 3 1/2-inch bamboo skewer into top of each apple. Set aside.
- Bring sugar, corn syrup, and 1 cup water to a boil in a small saucepan over medium-high heat. Cook until light amber and mixture registers 315 degrees.on a candy thermometer, 14 to 16 minutes. Immediately place pan into an ice-water bath. Remove, and let stand 2 minutes.
- Working with 1 apple at a time, dip into caramel, turning to coat completely and letting excess caramel drip back into pan (use a spoon to help with coating if needed). Transfer to prepared sheet; let cool completely. Candied apples can be stored in an airtight container in a cool, dry place up to 3 days.
Monday, October 3, 2011
Sweet Cherry Pie!

Fall is here in Cincinnati! Leaves are turning and the weather is getting brisk, which means it is time to start sipping on some hot apple cider, and get to work baking your pies! I am not a huge pie maker, however this little pie looks easy and fun to make.
Taken from the wonderful "What you give away you keep" blog, these cherry pies would make a great centerpiece or accent to any dessert table, or even a more rustic candy buffet table! They are the size of cupcakes and look delicious!
Check out the full picture tutorial on how to make these sweet treats!

Friday, September 23, 2011
The Perfect Combo! Yum!

Link to Recipe!
Thursday, September 15, 2011
Fall Sweets!

As always, Happy Planning!
Wednesday, August 17, 2011
8-12-2011
I was called upon to do an "impromptu" candy buffet for a couple that got married 8-12-2011. I had a consultation with the bride less than 2 weeks before her wedding and hit the ground running! Her and her fiance were so much fun and they wanted to reflect their personality with the theme of their candy buffet. This one was a blast to design and I managed to snap a few pictures before the crowd realized there was a candy buffet!


Thursday, June 23, 2011
Ice Cream Treats!

 I, like so many other sweet people, am a big fan of ice cream in all its forms! I came across an amazing collection of recipes today that will serve up a delicious variety of frosty goodness.
 If you are not much of a baker, then these recipes are for you! Most of them require no baking, and the rest of the baking is pretty minimal.
You can serve these treats at family gatherings, birthday parties, etc... For these treats on a large scale though, I would recommend putting them on dry ice, to limit the melting!
Tuesday, June 14, 2011
DIY Decorations

Follow this link for directions on how to DIY
Project Wedding
Monday, June 6, 2011
"Sweet Sayings"
Every Candy Buffet should be sweet and personal; a reflection of you and your groom's personality and style! This means no two candy buffets should be the same and this goes for candy buffet sayings as well.
Here is a list I came up with, with the help of a few friends and other candy buffet ladies of "sweet sayings" for your candy buffet.
1. "All you need is Love..and Candy"
2. "Nothing is sweeter than our love!"
3. “Enjoy the sweetness!
- from the
new Mr. & Mrs”
4." Love is Sweet! Enjoy a Treat!"
5. "Serving you a
little treat, to say we think your pretty sweet!"
6." Love is Sweet!"
7. "Our love is as sweet as candy!"
8. " We would like to
thank you for joining us on our wedding day!
Before you
leave take a treat and always remember
….Love is
Sweet!"

There are so many more that you could use that are not listed here! Remember, if need something custom created for your event, please let your candy buffet lady know. We are always looking for new sayings and creative ways to incorporate them into your candy buffet!
Tuesday, May 24, 2011
Why a Candy Buffet?
There is a reason you are seeing candy buffets pop up all over the place nowadays. The reason is they are just plain fun! I have yet to meet a person who has not heard of candy buffets and even more importantly doesn't like them. They are a delight to everyone that attends your party or event and a bright spot to those who "don't really wanna be here...". Here are a list of reasons I thought of that you would absolutely want a candy buffet at your event!
1) It's the "new" thing and the "old" thing.
 Let me explain. Candy buffets are becoming a super popular trend, and are considered a fresh and unique item to have at your event. However "new" this trend may be, you can still incorporate the "old" in with it. You can make it a very formal traditional display of candies and desserts that fit with a more elegant theme! Bridging the "new" and the "old" has never been this sweet!
2) It is personal.

Custom-made candy buffets are always made with the bride and groom as the focal point of the display. A good candy buffet planner will typically include the bride and groom's favorite candy (if within budget) as well as the style and theme they prefer. Candy buffet planners go out of their way to make it as unique as possible, sometimes including pictures of the bride and groom as young children in the display.
3) Dual purpose.

I know most of you have heard this before, but candy buffets function as a guest favor and as a decorative centerpiece! That is the best part about candy buffets. A lot of people search for a focal point for their event, and candy buffets really are it! I had several guest favors including a photo booth and a candy buffet at my wedding and the most positive comments I heard were about the candy buffet! So, if you are wondering why it is "so expensive" it is because candy buffet planners put a lot of time into making custom-designs that will be the life of the party!
4) The Experience.
 With Candy buffets you are getting an experience. I always go back to the "kid in the candy shop". Those were some of the best times in all of our lives, standing in the candy store and wondering which candy mom and dad would let us have! You still get this experience if you go places like Cracker Barrel or small mom and pop stores, however where else can you display your affection for candy better than your own party? By having a candy buffet you are creating a nostalgic experience for your guests and for yourself!
1) It's the "new" thing and the "old" thing.

2) It is personal.

Custom-made candy buffets are always made with the bride and groom as the focal point of the display. A good candy buffet planner will typically include the bride and groom's favorite candy (if within budget) as well as the style and theme they prefer. Candy buffet planners go out of their way to make it as unique as possible, sometimes including pictures of the bride and groom as young children in the display.
3) Dual purpose.

I know most of you have heard this before, but candy buffets function as a guest favor and as a decorative centerpiece! That is the best part about candy buffets. A lot of people search for a focal point for their event, and candy buffets really are it! I had several guest favors including a photo booth and a candy buffet at my wedding and the most positive comments I heard were about the candy buffet! So, if you are wondering why it is "so expensive" it is because candy buffet planners put a lot of time into making custom-designs that will be the life of the party!
4) The Experience.

Wednesday, May 18, 2011
Daily Deal is on!
Here is the link to the Wedding channel daily deal that is on right now. It last through the end of the day, so tell your friends in Cincinnati about our $150 off a candy buffet! The gift certificate is set up for weddings but may also be used for any event of your choosing.
Please follow this link to claim your deal!
http://deals.weddingchannel.com/deal/cincinnati/candyshop-buffets
Please follow this link to claim your deal!
http://deals.weddingchannel.com/deal/cincinnati/candyshop-buffets
Monday, May 16, 2011
Wednesday Daily Deal
My business, CandyShopBuffets, will be featured on Weddingchannel.com's Daily Deal on Wednesday the 18th! The deal is for $200 you can get a complete custom-made candy buffet valued at $350! This candy buffet is designed for 100 guests, however you can add additional guests after the gift certificate's purchase. Great way to save money on your event, and to add that WOW factor that you've been looking for on your wedding day!

Check our deal out on http://deals.weddingchannel.com/deal/cincinnati

If you have any questions regarding this deal, please let me know by email @ candyshopbuffets@gmail.com
Check our deal out on http://deals.weddingchannel.com/deal/cincinnati
Black, White, and Green with a hint of Zebra!
Happy Monday to all my sweet lovers :) Today is a great day not only because it is a fresh new week, but also because CandyShopBuffets just got it's pictures back from it's first promotional buffet! The theme for this buffet was black, white, and green. It has a modern look and faux diamond accents to match her dress! When Mirande first won the promotional buffet, she also told me that she was planning on having a zebra theme as well. I incorporated it as part of the candy buffet and it turned out gorgeous! All of the accents were made by hand, and add a unique style to the candy buffet. Here is a great example of our candy buffets, we hope you enjoy!


Subscribe to:
Posts (Atom)